
It begins with a single rip—an audible tearing that releases color and texture from the mundane grip of a page. For centuries, visionaries across continents have transformed those simple fragments into art that grips the imagination. In China around 200 BC, artisans experimented with the earliest forms of paper collage—long before this alchemy found its grand stage in European salons. And yet, the basic act remains as pure as it is enthralling: each torn edge is a revelation, coaxing the maker to see beyond shape into possibility.
Picture a bustling studio at dusk. The artist leans in, scattering scraps of magazine clippings, construction paper, or even old wallpaper. The hush is broken only by the quiet shuffle of paper pieces. In that unassuming dance, a whole universe of collage is brought to life—echoing the storied tradition that links our present to Picasso’s studio and Braque’s iconic breakthroughs. This is the emotional resonance of torn paper collage. Not just a pastime or a pastime or a technique, but a portal into richly layered storytelling in visual form.
Key Takeaways
- Rip Your Way into History: Tearing paper traces an unbroken line from ancient China to modern artists like Vik Muniz—connecting you to a living heritage of creative pioneers.
- Unleash Colorful Chaos: Torn paper collage thrives on overlapping shapes and textures, inviting unpredictable brilliance into your composition.
- Elevate Simple Materials: Ordinary items—newspaper scraps, leftover wrapping paper—become striking visual statements when torn, layered, and reimagined.
- Shape Your Own Style: From basic collage to layered worlds bursting with depth, these five techniques adapt effortlessly to any artistic vision or tradition.
Where Torn Paper Collage Began
Paper collage as a formal art form dates back to at least 200 BC, when paper itself was still a rarity. In 15th-century Europe, glimpses of collage appeared in devotional art, but the technique truly ignited in the 20th century. Artists like Georges Braque and Pablo Picasso startled the world by incorporating printed wallpaper and torn newsprint into their radical paintings, forging a dynamic new vocabulary for modern art.
Over the decades, other noteworthy figures emerged. Eileen Downes famously “paints” with bits of torn paper, assembling tonal gradations that mimic brushstrokes. Vik Muniz meticulously arranges strips of color into mirrors of 19th-century classics. Such experiments remind us that collage is endlessly versatile, mixing mediums and layering time periods into single, cohesive visions.
Gathering Your Tools of Transformation
A few simple, everyday items are enough to unlock entire worlds:
- Assorted colored paper (construction paper, scrapbook paper, magazines, or newspapers).
- Sharp scissors or a precision knife for crisp, clean cuts (though you’ll rely more on tearing by hand).
- Glue sticks or acid-free liquid glue for a secure hold.
- A sturdy surface like canvas or heavyweight paper.
- A pencil and eraser for initial sketches or planning.
Why These Materials Matter: The type of paper you select—be it newsprint with its faint text or bold, glossy magazine pages—will imprint your final piece with its own texture. Likewise, using quality glue can preserve your artwork for future admirers, ensuring colors stay vibrant and paper edges remain intact.
Technique #1: Basic Torn Paper Collage
Why it works: This straightforward approach emphasizes spontaneity, making it perfect for beginners or anyone craving the joy of effortless discovery.
-
Pick Your Palette
Choose a few complementary colors. For instance, earthy browns and greens evoke nature, while bright pinks and yellows might conjure pop-art energy. -
Tear with Intention
Tear your papers into small, irregular shapes and sizes. Embrace the rough edges—they lend instant texture. -
Sketch a Roadmap
Outline a loose design with pencil. A simple heart, a swirling abstract shape—whatever sparks your curiosity. -
Layer and Glue
Using a glue stick (or liquid glue for stronger hold), arrange the torn pieces on your surface. Overlap them for depth. -
Final Touches
Let your collage dry fully before trimming any overhanging edges. In that final reveal, you’ll see how the essence of torn paper naturally forms a surprising unity.
Technique #2: Torn Paper Mosaic
Why it works: By shaping your scraps into geometric forms, you echo the precision and grandeur of traditional mosaics—yet keep the raw, expressive impact of torn edges.
-
Coordinate Colors
Select a range of tones—maybe from light to dark—to create a unified mosaic effect. -
Uniform Tearing
Tear your paper into squares or rectangles. You can measure them lightly, but slight imperfections add charm. -
Draw Your Blueprint
Sketch your design, focusing on geometric elements. Think of classic mosaic motifs like arches, repeated tiles, or symmetrical patterns. -
Assemble the Puzzle
Glue each torn piece where it fits best, ensuring you keep shapes aligned for a pronounced mosaic structure. -
Sealing the Edges
After everything dries, run your hand lightly over the surface to check for loose corners. Secure any rogue edges with a dab of glue.
In the eyes of Vik Muniz, each fragment can function like a single tile in a grand mosaic—powerful when unified into a larger motif.
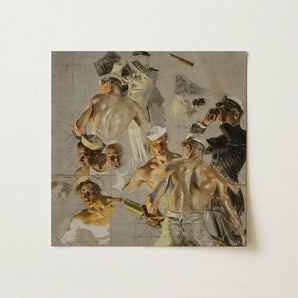
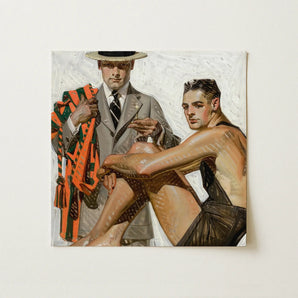
Technique #3: Torn Paper Portrait
Why it works: Though challenging, capturing a likeness with torn scraps teaches you to appreciate the nuances of color and shape. It’s also a mesmerizing way to bring someone’s visage to life.
-
Color Matching
Pick papers that approximate skin tones, hair color, or any other hues you need to replicate a person’s face. -
Tear Thoughtfully
Make certain shapes deliberately—for instance, longer, narrow pieces for eyebrows, or curved pieces for cheeks. Keep a variety of sizes at the ready. -
Outline the Face
Lightly sketch where the eyes, nose, and mouth belong. Proportions matter here, so spend time getting the placement right. -
Assemble Features
Glue each piece, letting the torn edges define the subtle curves of a cheekbone or the arch of an eyelid. Resist the urge to cut with scissors, which can diminish the organic energy of torn edges. -
Finishing Strokes
Once everything sets, you can add small pencil or pen details—perhaps a fine line for the eyelash or subtle shading. This final flourish can push your portrait from interpretive to strikingly real.
This technique calls to mind the work of Eileen Downes, who arranges snippets of paper the way a painter daubs color. By layering texture precisely, she conveys depth and emotion where you might least expect it.
Technique #4: Layered Torn Paper Collage
Why it works: By stacking torn layers, you create a dimensional playground that sparks curiosity, inviting onlookers to peer beyond the surface.
-
Select a Cohesive Palette
Perhaps choose three or four colors that harmonize. Subtle contrasts—like shades of blues and greens—often amplify each other in layers. -
Build from the Background
Sketch a background shape first, then tear and place those foundational pieces. Layer on top with medium tones, leaving space for lighter (or brighter) pieces to pop. -
Heighten Depth
Overlap edges so each layer peeks out behind the next. This orchestrated variation can mimic a mountainscape, drifting clouds, or even an urban skyline. -
Focus on Transitions
Where one layer meets another, let some edges remain ragged while others form a cleaner tear. These transitions reveal the collage’s underlying complexity. -
Secure and Refine
After your final layer, smooth down any lifting corners with glue. Step back and revel in the multidimensional tapestry you’ve created.
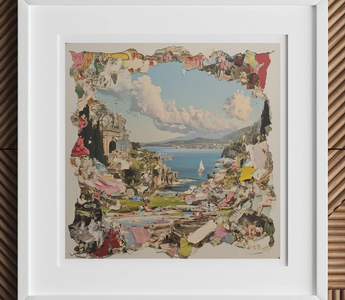
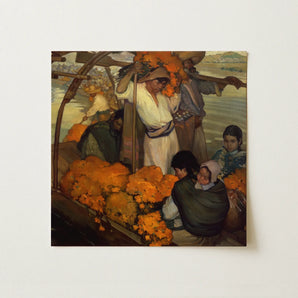
Technique #5: Torn Paper Landscape
Why it works: Collage offers an instantly painterly approach to capturing nature’s sweeping vistas or intimate nooks.
-
Match Landscape Hues
Gather papers in colors that embody your chosen scene—lush greens, earthy browns, airy blues, or fiery reds for desert scenes. -
Map the Scene
Sketch your horizon line, mountains, or any major elements like trees or water. Keep the design loose but purposeful. -
Tear with Texture in Mind
Shred paper to evoke rolling hills, jagged cliffs, or the swirling movement of clouds. Each piece can convey a different textural depth. -
Place Pieces in Order
Start with the sky (background) and layer forward. Overlap to show perspective—distant mountains partially obscured by nearer fields, for instance. -
Detail and Dimension
Once dry, consider adding subtle pen lines or shading to intensify the sense of realism. Small touches can transform torn scraps into a living environment.
Matching Torn Paper Techniques to Artistic Styles
Contemporary: Think bold color blocks, geometric shards, and experimental layering. Throw in metallic or neon papers for that edgy flair.
Traditional: Opt for muted, classic tones—like sepia, cream, and deep burgundy—and craft timeless motifs reminiscent of early Renaissance collages.
Mixed Media: Combine your torn paper foundation with brushstrokes of watercolor or ink outlines. This fusion recalls the radical collages of Picasso, who welcomed newsprint and paint in the same breath.
Why Torn Paper Collage Endures
Beyond aesthetics, torn paper collage resonates because it’s accessible, environmentally friendly (often using recycled materials), and infinitely adaptable. Every project is a puzzle where each piece finds its place or gets shifted until the composition feels right. There is a sense of freedom—no lines to color within, just shapes to tear and layer.
Many artists are drawn to the tactile experience. Tearing, arranging, and gluing fosters a close relationship with the work. The intangible thought process—deciding which piece goes where—becomes part of the artistry itself. And the reward? A one-of-a-kind creation that bridges centuries of tradition, from ancient Chinese experiments to the modern collages electrifying today’s galleries.
Torn paper collage invites us to see beauty in discarded corners of our lives—scraps of magazines, sheets of leftover scrapbook paper. That daily debris, in the right hands, transforms into evocative mosaics, layered dreamscapes, or even heartfelt portraits. What begins with a rip ends as a tapestry of color, history, and personal expression. And with these five techniques as your companions, you’re ready to explore uncharted territory in the art world—one torn edge at a time.
